indyana
Well-Known Member
- Messages
- 2,336
- Location
- Massachusetts, United States
Since the DIY seal job on my acrylic vivarium started leaking, it's time for a rebuild in an 18x18x24 Exo Terra terrarium.
A lot of the plants and substrate from the existing viv will be transferred over to keep the bioactive base going, but I decided that I wanted to redo the background and wood features. In the original build, the planters just didn't do well, probably because they were too far up and easily dehydrated. Luna, the crested gecko resident, never has used the cork branch crossbeams that I've seen, so those won't be included in the new build. The cork tube "log", however, is an absolute favorite sleeping place during the day. The new build will include a similar feature.
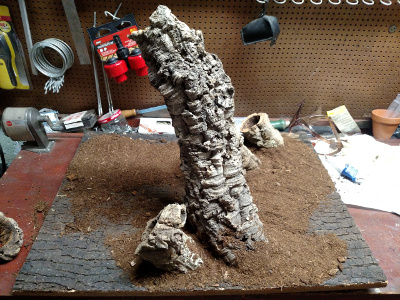
I completed the first stage today of building the background wall outside the viv. The background will need to cure for a few days before I can glue it into the Exo Terra enclosure. Good project for a long weekend!
Note: The techniques here are described in a tutorial by New England Herpetoculture. Some of the materials were part of one of their background kits, while others were purchased separately.
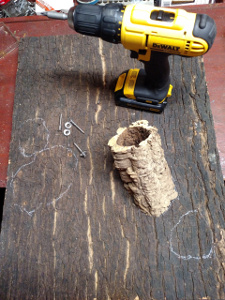
Step 1: Spend hours obsessing over where to put each piece of cork... hehe
The pieces you can see in the pictures are a forest tile background, one large cork round, two small modular planters (essentially cork round ends with a 45-degree angle cut into the back), and one larger modular planter. Not pictured is a large ghostwood branch that's going to run up through the cage, but I arranged everything together in the cage before deciding.
The "log" is a large cork round. I just took a saw to one end of it to get it to sit at an angle against the wall.
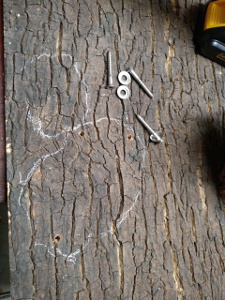
When I finally found an arrangement I liked, I traced each one with a marking pencil. On the two larger cork pieces, I put marks where I thought support screws were needed and drilled some guide holes. Then, screws with washes on them were fed into the back and up into the edges of the cork pieces. This is not as easy as it sounds. Two of my planned holes proved to be in bad locations (cork edge broke) and needed to be redrilled... ug. Whatever, eventually got the two larger pieces screwed down.
Next, I ran a bead of clear silicone aquarium sealant around the edges of the pieces to add more support to the screws. The two smaller planters were just glued right down with silicone. As I worked, I smoothed the silicone into the edges with a gloved finger and then pressed NEHerp's background mix onto the exposed sealant (it's a fine mix of coco fiber, peat moss, wood, etc.). When everything was glued down, I also ran some random patterns across the background and coated in background mix as well.
A lot of the plants and substrate from the existing viv will be transferred over to keep the bioactive base going, but I decided that I wanted to redo the background and wood features. In the original build, the planters just didn't do well, probably because they were too far up and easily dehydrated. Luna, the crested gecko resident, never has used the cork branch crossbeams that I've seen, so those won't be included in the new build. The cork tube "log", however, is an absolute favorite sleeping place during the day. The new build will include a similar feature.
I completed the first stage today of building the background wall outside the viv. The background will need to cure for a few days before I can glue it into the Exo Terra enclosure. Good project for a long weekend!
Note: The techniques here are described in a tutorial by New England Herpetoculture. Some of the materials were part of one of their background kits, while others were purchased separately.
Step 1: Spend hours obsessing over where to put each piece of cork... hehe
The pieces you can see in the pictures are a forest tile background, one large cork round, two small modular planters (essentially cork round ends with a 45-degree angle cut into the back), and one larger modular planter. Not pictured is a large ghostwood branch that's going to run up through the cage, but I arranged everything together in the cage before deciding.
The "log" is a large cork round. I just took a saw to one end of it to get it to sit at an angle against the wall.
When I finally found an arrangement I liked, I traced each one with a marking pencil. On the two larger cork pieces, I put marks where I thought support screws were needed and drilled some guide holes. Then, screws with washes on them were fed into the back and up into the edges of the cork pieces. This is not as easy as it sounds. Two of my planned holes proved to be in bad locations (cork edge broke) and needed to be redrilled... ug. Whatever, eventually got the two larger pieces screwed down.
Next, I ran a bead of clear silicone aquarium sealant around the edges of the pieces to add more support to the screws. The two smaller planters were just glued right down with silicone. As I worked, I smoothed the silicone into the edges with a gloved finger and then pressed NEHerp's background mix onto the exposed sealant (it's a fine mix of coco fiber, peat moss, wood, etc.). When everything was glued down, I also ran some random patterns across the background and coated in background mix as well.


Last edited:


 Need to trim those a bit before replanting in the new viv.


