LzzrdBoy
The Reverend LzzrdBoy
- Messages
- 85
- Location
- Columbia, SC
So after I picked up the 50 gallon bowfront aquarium on Friday I began to draw up my plans for creating a new vivarium for Neo the Leopard Gecko. As I state in my original aquarium thread, the height is a little much but given the fact it was free, I'm not complaining. I'm going to use this thread to post pics, videos, and details of the project. I'm guessing this one will take me around 2-3 weeks given its size, the detail I plan to apply, and my serious lack of free time.
I'm at the office right now but upon returning home I'll attach photos to each step listed below.
General Plan: To create a modular red-rock (canyon) styled environment incorporating background, sides, 3 hides, food/water, and misc. climbing structures.
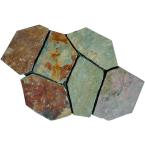
Here's a photo of the look I'm shooting for. Not the actual landscape but more the texture and shape of the rocks in the photo.

And here's a photo (Courtesy of Becky Wheeler) of what I'm "hoping" my finished structure will look like. This is however from a very large vivarium so mine will be much smaller in detail.

And here's one more photo which I'll update from time to time which shows the tank with the structures in it.

Must Haves:
Supplies List:
STEP 1:
Measure the surface area to be covered by the background/sides/bottom of the structure to ensure good fit. My unit is 24" wide and 18" high. The top of the unit has a support bar which runs from front to back down the center. For this reason I had to create my background/sides in two modular pieces. The left module includes the left background and side pieces. The right module includes the right background and side pieces.
STEP 2:
Cut the foam board into appropriate sizes based on measurements taken in STEP 1. I cut two 12"x18" pieces for the background panels and two 6"x18" pieces for the side panels. I then cut two additional pieces which are used to both support the sides when adhered to the background panels, and act as roofs for each of the corner hides. I also cut four additional smaller pieces to place in the corner where the side meets the background to provide additional support during construction.
STEP 3:
Using Liquid Nails adhere the side panels to the background panels. Additionally, adhere the smaller pieces to both the side and background panels (in the corner where they meet) for extra support. At this point I decided to take a break and let the Liquid Nails setup a little before proceeding. On smaller projects there is no need to wait but on large projects where weight could be an issue, I recommend a minimum of 1 hour to allow the Liquid Nails to set up.
The photos below were taken after applying the first layer of grout, however, you should be able to get the idea behind the method for creating the red rock canyon look.
This is the right-side module.

This is the left side module.

STEP 4:
While awaiting the adhesive to set I began to shape and sand the smaller pieces, which, if arranged properly, will simulate the look and texture of the rock & cliffs in the photo at the top of this thread. When attempting to simulate the curved and rounded shape of the rock I found it was much easier to cut out the basic shape using my old soldering iron. It's a pen-style iron with a tip a smidgen longer than an inch. Using this iron allows me to easily curve the shape of the foam which, when sanded, looks quite a lot like the real thing. Cutting the shapes at varying lengths ensures a staggered look to the design. To create "shelves" in the structure I cut larger pieces which are also sanded and shaped to blend into the rest of the structure while still providing an outcrop of sorts for Neo to chill on.
This is a photo of a small piece of foam after cutting, shaping, and sanding the edges. The next photo shows the soldering iron I used to cut out the pieces and form the basic shape of each piece. The sanding block pictured in the third photo is simply there for reference. I've found it much easier to work with blocks than paper. Just a little tip!


STEP 5:
Now that the Liquid Nails has had time to set up a little more, it's onto the piecing together of the puzzle, if you will. With drawing in hand I place the pieces of rock wall starting from the top of the background down. Individual pieces are placed level in a horizontal fashion from left to right. As each row is completed from edge to edge I add the "shelf" pieces at various locations among them. The idea is to give Neo an easy path ensuring he can step from one "shelf" to another moving around the background and sides both vertically as well as horizontally. While placing the various pieces I decided to add some larger corner "shelf" pieces to simulate overhangs and larger rocks which will also serve as a place for Neo to chill while moving about the structure.
Here are a few close-ups of the structure including "shelves", hides, etc.


STEP 6:
At this point, while allowing the rock pieces to set up, I begin working on the two hides. Each hide will reside in the bottom of the corner of each of the two halves of the structure. The cool hide has a floor panel created from the foam which has been shaped, and sanded to look like the rest of the rock within the structure. The warm hide has no floor as the UTH (Under Tank Heater) will be beneath it. Each hide is constructed by using small pieces of foam panel shaped and sanded to look like fallen stones/boulders. Corners of the structure are created by stacking small (1"-1.5") misshapen pieces of "rock" while sides are done using the same concept but with rectangular pieces of small "rock". By stacking one or two of the rectangular pieces followed by 2 of the smaller "stone" pieces (one on each end) followed by 1 or 2 more rectangular pieces one can easily create a natural looking "window" through which you can easily view the inhabitant(s) of the hide.
Here are photos of each hide. The first is the cool hide (built in floor) while the second is the warm hide (no floor).


STEP 7:
At this point the essentially complete structure is ready to dry before starting to grout. If you're as much of a perfectionist as myself, you'll most likely stand back at this point and say "WAIT! I can make this look better!". As I eyeballed the nearly finished product I noticed there were several spots where gaps were visible between the "rock" pieces. In an effort to close said gaps I created some extremely small pieces of sanded "stone" and adhered them to the various holes where they seemed to be needed. In an effort to conceal the majority of the "seam" down the middle of the background piece I adhered several pieces of the smaller pieces in a way where they only slightly overlapped from the left to the right or from the right to the left, of the "seam". Although this doesn't hide the "seam" completely it certainly throws off the eye of the viewer and breaks up the vertical line. Since the back of this aquarium is mirrored I need to ensure as little of it shows through the background as possible.
STEP 8:
After allowing all pieces to dry on the sides/background I started mixing my grout. The first layer contains a half teaspoon or so of cement color and is mixed so that its consistency is that of runny pancake mix. Using a thinner first coat will ensure most, if not all of the cracks are penetrated by the grout. Working on the side first I laid the background down so that the side was flat on the table. Using the larger of my brushes I began to "slop" on the grout while wiping the brush against the edges of the rocks allowing the grout to run down in between all the pieces. Next I switch to a medium sized brush and fill in as many of the little polystyrene holes as possible. Lastly I use a small brush to squeeze grout into every last nook and cranny. While the first coat of grout applied to the side panel dries I turn the structure so that the background is now flat on the table. Using the same method stated above I cover the entire background piece in grout. When done, it's time to switch to the other half of the structure and repeat the process. Once both halves have received their first complete coat I set the whole thing aside and allow it to dry for a full 24 hours.
These can be found near the top of this thread but I wanted to put them here as well to show what the two modules look like following the first application of grout.

Here are a few photos of the Grout, Color, and Paint I'm using and will be using throughout the project.


*Note... Although the Corona is not a requirement for this build I highly recommend you pick some up anyway. You'll want it at some point I guarantee you!
STEP 9:
After allowing the first layer of grout to dry and harden we're now into day 2. This evening I started by mixing a new batch of grout. Remember to add your cement color to the water BEFORE you add the grout mix. If not, you'll end up with a "speckled" look which simply looks strange. This batch of grout should be a little thicker than the first. Instead of runny pancake mix I suggest "standard" pancake mix as the consistency. Once mixed well, begin slapping it on ensuring you get into virtually every single crack and crevice. Again, allow the grout to fully dry and harden for at least 24 hours before proceeding. Some will tell you there is no need to wait this long in between applications of grout, however, from my experience, a full day is required. Feel free to use your own judgment however.
Here's a photo of the right-side module after applying grout layer #2.
STEP 10:
COMING SOON!
As of today, this is last completed step. I'll be applying my third coat of grout tonight or tomorrow night (The boy has baseball games both nights so we'll see how much time I can find). My hope is that this "how-to" at the very least, will provide an alternative set of instructions for creating a look unique of those found at sites like lizard-landscapes, youtube, etc. Although the methods outlined elsewhere are similar, none of the processes outlined allowed me to achieve the look I wanted. That said, I guess we'll see how it looks in the end.
Sources:
Fake Rock Man @ Lizard-Landscapes - Lizard care, and fake rock wall landscapes
Becky Wheeler @Youtube (Canyon Vivarium Background Video Series) - http://youtu.be/Uk1XloJMD0Q
Becky Wheeler @ RFUK (Canyon Vivarium Background Forum Thread) - http://www.reptileforums.co.uk/forums/habitat/633351-grand-canyon-vivarium-background-pics.html
I'm at the office right now but upon returning home I'll attach photos to each step listed below.
General Plan: To create a modular red-rock (canyon) styled environment incorporating background, sides, 3 hides, food/water, and misc. climbing structures.
Here's a photo of the look I'm shooting for. Not the actual landscape but more the texture and shape of the rocks in the photo.
And here's a photo (Courtesy of Becky Wheeler) of what I'm "hoping" my finished structure will look like. This is however from a very large vivarium so mine will be much smaller in detail.
And here's one more photo which I'll update from time to time which shows the tank with the structures in it.
Must Haves:
- Full height 3D background
- 3/4 height sides
- Cool hide
- Warm hide
- Humid hide
- Food dish
- Water dish
- "Shelves" for climbing/chillin'
Supplies List:
- 6-pack of 3/4" panel foam insulation ($9.23/6 @ Lowes)
- 3 tubes of Liquid Nails ($1.74/ea @ Lowes)
- 10 lbs of White unsanded grout ($11.78 @ Lowes)
- 10oz of Cement color - Terra Cotta ($4.38 @ Lowes)
- 1 gallon of Shields All all-purpose clear sealant ($24.75 @ Hy Tech Sales)
- 1 tube each burnt umber, white, canyon red, and ivy green acrylic paint ($.97/ea @ Walmart)
- 4 or 5 mixed size paint brushes ($1.97 @ Walmart)
- 1 fine grit sandpaper block ($1.99 @ Lowes)
- 1 knife (any old small one will do)
- 1 ancient pen-style soldering gun (already own/not really a requirement for most)
- ShopVac or alike to suck up the itty bitty pieces of styrofoam
STEP 1:
Measure the surface area to be covered by the background/sides/bottom of the structure to ensure good fit. My unit is 24" wide and 18" high. The top of the unit has a support bar which runs from front to back down the center. For this reason I had to create my background/sides in two modular pieces. The left module includes the left background and side pieces. The right module includes the right background and side pieces.
STEP 2:
Cut the foam board into appropriate sizes based on measurements taken in STEP 1. I cut two 12"x18" pieces for the background panels and two 6"x18" pieces for the side panels. I then cut two additional pieces which are used to both support the sides when adhered to the background panels, and act as roofs for each of the corner hides. I also cut four additional smaller pieces to place in the corner where the side meets the background to provide additional support during construction.
STEP 3:
Using Liquid Nails adhere the side panels to the background panels. Additionally, adhere the smaller pieces to both the side and background panels (in the corner where they meet) for extra support. At this point I decided to take a break and let the Liquid Nails setup a little before proceeding. On smaller projects there is no need to wait but on large projects where weight could be an issue, I recommend a minimum of 1 hour to allow the Liquid Nails to set up.
The photos below were taken after applying the first layer of grout, however, you should be able to get the idea behind the method for creating the red rock canyon look.
This is the right-side module.
This is the left side module.
STEP 4:
While awaiting the adhesive to set I began to shape and sand the smaller pieces, which, if arranged properly, will simulate the look and texture of the rock & cliffs in the photo at the top of this thread. When attempting to simulate the curved and rounded shape of the rock I found it was much easier to cut out the basic shape using my old soldering iron. It's a pen-style iron with a tip a smidgen longer than an inch. Using this iron allows me to easily curve the shape of the foam which, when sanded, looks quite a lot like the real thing. Cutting the shapes at varying lengths ensures a staggered look to the design. To create "shelves" in the structure I cut larger pieces which are also sanded and shaped to blend into the rest of the structure while still providing an outcrop of sorts for Neo to chill on.
This is a photo of a small piece of foam after cutting, shaping, and sanding the edges. The next photo shows the soldering iron I used to cut out the pieces and form the basic shape of each piece. The sanding block pictured in the third photo is simply there for reference. I've found it much easier to work with blocks than paper. Just a little tip!
STEP 5:
Now that the Liquid Nails has had time to set up a little more, it's onto the piecing together of the puzzle, if you will. With drawing in hand I place the pieces of rock wall starting from the top of the background down. Individual pieces are placed level in a horizontal fashion from left to right. As each row is completed from edge to edge I add the "shelf" pieces at various locations among them. The idea is to give Neo an easy path ensuring he can step from one "shelf" to another moving around the background and sides both vertically as well as horizontally. While placing the various pieces I decided to add some larger corner "shelf" pieces to simulate overhangs and larger rocks which will also serve as a place for Neo to chill while moving about the structure.
Here are a few close-ups of the structure including "shelves", hides, etc.
STEP 6:
At this point, while allowing the rock pieces to set up, I begin working on the two hides. Each hide will reside in the bottom of the corner of each of the two halves of the structure. The cool hide has a floor panel created from the foam which has been shaped, and sanded to look like the rest of the rock within the structure. The warm hide has no floor as the UTH (Under Tank Heater) will be beneath it. Each hide is constructed by using small pieces of foam panel shaped and sanded to look like fallen stones/boulders. Corners of the structure are created by stacking small (1"-1.5") misshapen pieces of "rock" while sides are done using the same concept but with rectangular pieces of small "rock". By stacking one or two of the rectangular pieces followed by 2 of the smaller "stone" pieces (one on each end) followed by 1 or 2 more rectangular pieces one can easily create a natural looking "window" through which you can easily view the inhabitant(s) of the hide.
Here are photos of each hide. The first is the cool hide (built in floor) while the second is the warm hide (no floor).
STEP 7:
At this point the essentially complete structure is ready to dry before starting to grout. If you're as much of a perfectionist as myself, you'll most likely stand back at this point and say "WAIT! I can make this look better!". As I eyeballed the nearly finished product I noticed there were several spots where gaps were visible between the "rock" pieces. In an effort to close said gaps I created some extremely small pieces of sanded "stone" and adhered them to the various holes where they seemed to be needed. In an effort to conceal the majority of the "seam" down the middle of the background piece I adhered several pieces of the smaller pieces in a way where they only slightly overlapped from the left to the right or from the right to the left, of the "seam". Although this doesn't hide the "seam" completely it certainly throws off the eye of the viewer and breaks up the vertical line. Since the back of this aquarium is mirrored I need to ensure as little of it shows through the background as possible.
STEP 8:
After allowing all pieces to dry on the sides/background I started mixing my grout. The first layer contains a half teaspoon or so of cement color and is mixed so that its consistency is that of runny pancake mix. Using a thinner first coat will ensure most, if not all of the cracks are penetrated by the grout. Working on the side first I laid the background down so that the side was flat on the table. Using the larger of my brushes I began to "slop" on the grout while wiping the brush against the edges of the rocks allowing the grout to run down in between all the pieces. Next I switch to a medium sized brush and fill in as many of the little polystyrene holes as possible. Lastly I use a small brush to squeeze grout into every last nook and cranny. While the first coat of grout applied to the side panel dries I turn the structure so that the background is now flat on the table. Using the same method stated above I cover the entire background piece in grout. When done, it's time to switch to the other half of the structure and repeat the process. Once both halves have received their first complete coat I set the whole thing aside and allow it to dry for a full 24 hours.
These can be found near the top of this thread but I wanted to put them here as well to show what the two modules look like following the first application of grout.
Here are a few photos of the Grout, Color, and Paint I'm using and will be using throughout the project.
*Note... Although the Corona is not a requirement for this build I highly recommend you pick some up anyway. You'll want it at some point I guarantee you!
STEP 9:
After allowing the first layer of grout to dry and harden we're now into day 2. This evening I started by mixing a new batch of grout. Remember to add your cement color to the water BEFORE you add the grout mix. If not, you'll end up with a "speckled" look which simply looks strange. This batch of grout should be a little thicker than the first. Instead of runny pancake mix I suggest "standard" pancake mix as the consistency. Once mixed well, begin slapping it on ensuring you get into virtually every single crack and crevice. Again, allow the grout to fully dry and harden for at least 24 hours before proceeding. Some will tell you there is no need to wait this long in between applications of grout, however, from my experience, a full day is required. Feel free to use your own judgment however.
Here's a photo of the right-side module after applying grout layer #2.
STEP 10:
COMING SOON!
As of today, this is last completed step. I'll be applying my third coat of grout tonight or tomorrow night (The boy has baseball games both nights so we'll see how much time I can find). My hope is that this "how-to" at the very least, will provide an alternative set of instructions for creating a look unique of those found at sites like lizard-landscapes, youtube, etc. Although the methods outlined elsewhere are similar, none of the processes outlined allowed me to achieve the look I wanted. That said, I guess we'll see how it looks in the end.
Sources:
Fake Rock Man @ Lizard-Landscapes - Lizard care, and fake rock wall landscapes
Becky Wheeler @Youtube (Canyon Vivarium Background Video Series) - http://youtu.be/Uk1XloJMD0Q
Becky Wheeler @ RFUK (Canyon Vivarium Background Forum Thread) - http://www.reptileforums.co.uk/forums/habitat/633351-grand-canyon-vivarium-background-pics.html
Last edited: