Cliff43J
New Member
- Messages
- 17
I have watched so many videos on YouTube about raising crickets, that I see them in my sleep...lol... What bin to use? How to lay it out? Well FWIW, here is what I ended up with.
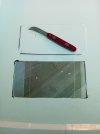
To keep costs relatively low I went with 3 Sterilite, 90-quart, translucent bins. It is not a heavy-duty bin, but then crickets are not exactly rowdy critters. They should be a good match. The 90-quart bin appeared to be a good size for me to handle easily. There were larger bins and more heavy-duty bins at higher prices, but they didn't fit in with what I have in mind. Later on I can always upgrade if need be. Ventilation is always a good idea for living critters, regardless of their sizes. I settled on installing the vent on the top as it is a softer plastic and designed to flex. As the bin itself is a harder plastic, I figured that it would be more prone to cracking down the road. The accompanying photos pretty much show all of the steps. I went on eBay and found a piece of 400 mesh stainless steel mesh at a good price and bought it. I had seen in one video where crickets were said to have eaten their way through nylon or fiberglass screen material. Stainless steel was the furthest thing from my mind, but a good price attracted me. I drilled 3/8" holes in each of the 4 corners to relieve any stress caused by 90-degree corners. The knife that I use is a grafting knife sold by Felco and made by Victorinox of Swiss Army Knife fame. It is razor sharp. The mesh was held in place with white Duck tape that I had on hand. Nothing fancy, and it works.
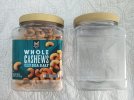
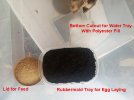
In the interior I have feed and water trays made from cashew nut containers. I buy these at Sam's and enjoy emptying them. The lids hold the chicken scratch which I grind finer. I cut the bottom out of the plastic jar, put in some polyester fill to keep the crickets from drowning and add water. Quick and relatively easy.
To keep costs relatively low I went with 3 Sterilite, 90-quart, translucent bins. It is not a heavy-duty bin, but then crickets are not exactly rowdy critters. They should be a good match. The 90-quart bin appeared to be a good size for me to handle easily. There were larger bins and more heavy-duty bins at higher prices, but they didn't fit in with what I have in mind. Later on I can always upgrade if need be. Ventilation is always a good idea for living critters, regardless of their sizes. I settled on installing the vent on the top as it is a softer plastic and designed to flex. As the bin itself is a harder plastic, I figured that it would be more prone to cracking down the road. The accompanying photos pretty much show all of the steps. I went on eBay and found a piece of 400 mesh stainless steel mesh at a good price and bought it. I had seen in one video where crickets were said to have eaten their way through nylon or fiberglass screen material. Stainless steel was the furthest thing from my mind, but a good price attracted me. I drilled 3/8" holes in each of the 4 corners to relieve any stress caused by 90-degree corners. The knife that I use is a grafting knife sold by Felco and made by Victorinox of Swiss Army Knife fame. It is razor sharp. The mesh was held in place with white Duck tape that I had on hand. Nothing fancy, and it works.
In the interior I have feed and water trays made from cashew nut containers. I buy these at Sam's and enjoy emptying them. The lids hold the chicken scratch which I grind finer. I cut the bottom out of the plastic jar, put in some polyester fill to keep the crickets from drowning and add water. Quick and relatively easy.
Attachments
-
 Big Bin.jpg145.2 KB · Views: 2
 -
 Bin Top Layout.jpg168.9 KB · Views: 2
 -
 Bin Top Cutout.jpg200.9 KB · Views: 2
 -
 Bin Top Ventilation Installed.jpg173.6 KB · Views: 1
 -
 Bin Feeder Raw Materials.jpg224.7 KB · Views: 1
 -
 Bin Feeders in Use.jpg207.7 KB · Views: 1
 -
 Egg Laying Container Label 2.jpg204.2 KB · Views: 2
